3. Browser
After signing in, the Browser tab will appear. On this page, more information about the layout, the views, and the functionality of the browser can be found.
3.1. Layout
The layout of the page may differ, depending on the chosen settings, but the general layout is as follows:
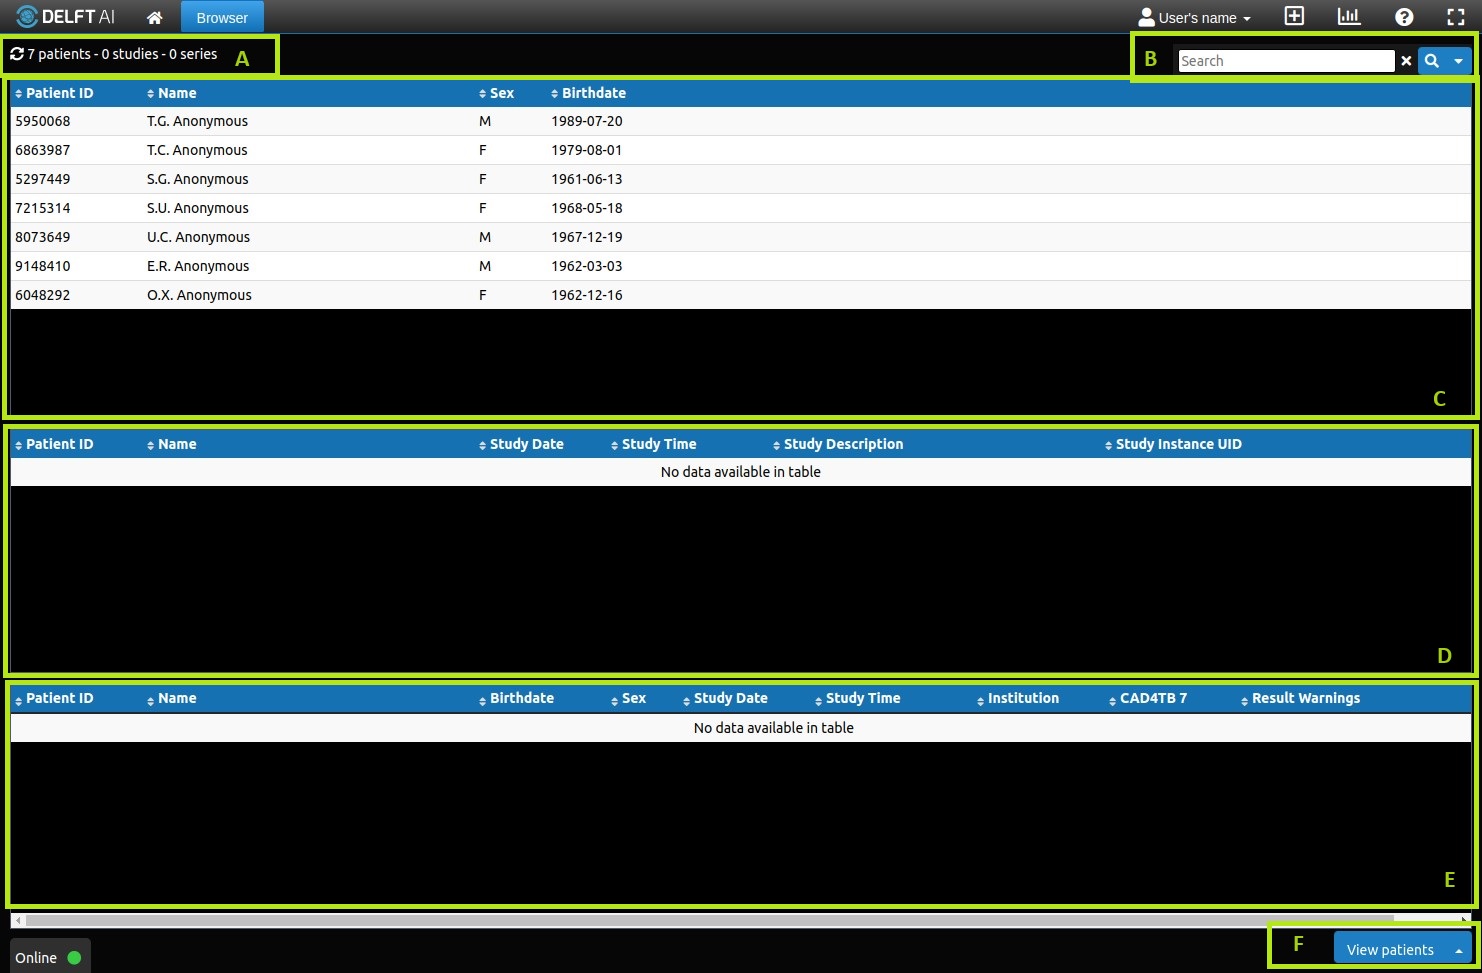
Fig. 3.1 Browser
The page is divided into a number of sections:
- (A) Table information section
Gives information on the work lists shown on the page. Total selected cases / total cases is displayed.
- (B) Search section
Functionality for (advanced) searching the work lists.
- (C) Patients work list [1]
This list contains all patients that are available in the archive.
- (D) Studies work list [1]
This list contains all the studies that belong to the selected patient(s).
- (E) Series work list
This list contains all the series that belong to the selected study(ies).
- (F) Page tools
3.2. Search

Fig. 3.2 Search box
The default search box, shown in Fig. Fig. 3.2, will search the first work list that is shown on screen and the search be restricted to the columns visible. If you want to search other columns as well, they have to be enabled first from the settings menu (consult Browser for more information). After typing a search term in the search box, the search is executed by pressing the Enter-key or clicking the icon.

Fig. 3.3 Advanced search box
To open the advanced search functionality, the icon has to be clicked. This will enable searching based on study date (Fig. Fig. 3.3). Contrary to the normal search, the StudyDate column does not have to be enabled to search on it. By clicking the Start date or End date input box, a date picker will appear that enables you to easily select a date. It is also possible to only select a Start or End date. This will search from the start date onwards, or search until the end date, respectively. After filling in the required dates, press the icon to execute the search. The icon closes the advanced search.
The search can be cleared by pressing the icon.
3.3. Views
The browser has different Views. Each of these Views has a different layout and a different number of work lists. The following Views are available:
Patients: This view shows the Patients, Studies and Series work lists.
Studies: This view shows the Studies and Series work lists.
Series : This view shows only the Series work list.
The view can be changed in the settings menu.
3.4. Functionality
The following actions can be performed on each of the work lists:
- Sort:
To sort a work list, click on the title of the column that you want to sort on. Click once to sort ascending (), click twice to sort descending (), and click a third time to cancel sorting. To sort on multiple columns simultaneously, hold down the
Shiftkey.- Filter:
To filter the work list, enter a filter value in the Search box (B) and press
Enter. To clear the filter, empty the search box and pressEnteragain. Note: The filter will only work on the work list that is shown on top.- Refresh:
To refresh the work lists, click (A).
- Select:
To select an item from a work list, click on it. To select multiple items, click and hold down the
Ctrlkey (single items) orShiftkey (range of items).- View:
To view the images belonging to the selected item(s) in the work list, select the item(s) and click the View button (F). The Viewer appears, showing the selected images. 1, 2 or 4 items can be viewed simultaneously.
- Download data:
To export all cases that are shown in the worklist, press the Download data button (F). All data (columns) that are shown in the work list will be downloaded to a comma-separated file. Note: if a search filter is applied, only the filtered cases will be exported.
- Download images:
To download images, select the item(s) from the worklist and press Download images button (F). All selected items will be bundled in an uncompressed archive and are downloaded. Note: it can take a while before the download begins. For
CLOUD, a maximum of 10 images can be downloaded at once.- Restart processing:
To restart an algorithm, right click a case in the work list, and press the Start <algorithm> option from the context menu (
fig_browser_contextmenu) [3]. Up to 10 items can be restarted simultaneously by selecting multiple cases. Note: processing is done sequentially and depending on the length of the queue, it might take some time before results appear. It is possible that you will receive an error when restarting a case (Case could not be started. Too many instances.) If this happens, please contact your local system administrator.
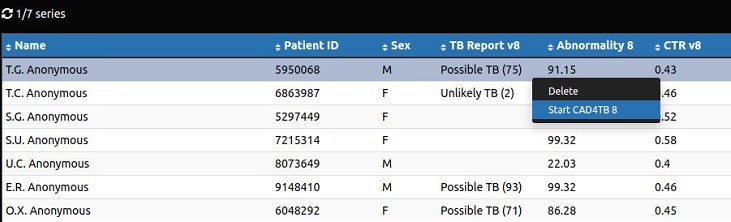
Browser context menu
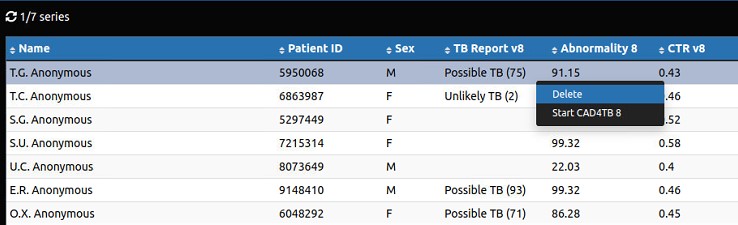
- Delete image:
To delete an image, select the item(s) from the worklist, right click and select Delete (
fig_browser_deleteoption). A pop up will appear to confirm the deletion, type delete to confirm the action. Note that the delete functionality is only available for administrators.
Note
Depending on the application settings, an image might be opened immediately after clicking the item in the series work list.